Today's blog is very short indeed! We, as you can imagine, are gearing up for the Holidays, with travels to family and friends, and lots of Holiday cheer!
Jody and I want to wish everyone Merry Christmas, and a very Happy New Year!
We appreciate everyone that has helped make our blog the success that it has turned into. Our readers are very important to us, and we enjoy having you all come to our little corner of the internet!
We wish all of you the very best! So sit back, turn up the volume, and enjoy the cozy little fire.
Thank you everyone!
Sunday 23 December 2012
Thursday 20 December 2012
Ginger-bread Horror finals!
I recieved the finals on the gingerbread-man torture shoot we did at Westside studio last week. These were for Fangoria horror magazine.
Vicky Lam was the photographer, and it was a pleasure to work with her for sure!
Anyways, sit back, and enjoy the holiday horror that awaits.......................


Vicky Lam was the photographer, and it was a pleasure to work with her for sure!
Anyways, sit back, and enjoy the holiday horror that awaits.......................


Wednesday 19 December 2012
3D Unwrapping (made easy!)
We finished the other 2 parts of the Molson Hockey Games, but the time was getting so tight, I was really unable to get any decent photo's for posting :( It can be quite a job to remember to stop and take them all the time!
I get alot of emails inquiring about "un-wrapping" 3d geometry for planar cutting on our Techno. In-fact, the last 2 jobs featured the use of this for a couple of pieces, the Monopoly hat, and the sides of the Plinko game ramp.
Some Cad software has this ability built into it, right out of the box. Other programs, like Sketch-up have 3rd party 'add-on' plugins, which do work. We do our full 3d modelling mostly with Hexagon, which is solely a polygon modeller. This can have it's draw-backs when trying to lay geometry flat out. Trying to unwrap it in programs like Corel are impossible to do, as they don't support 3d geometry.
Enter our little secret!
We actually use 2 programs for this. One is called Pepakura designer. This was developed for making paper models from 3d polygon-models. It's a nifty package, but it's geared toward printing on sheets of paper with tabs, that you trim out, fold, and glue up. We have actually done this for creating printed texture maps, for applying to large 3d models we have machined. The draw-back is it doesn't account for any material thicknesses.
That's where a little power-house piece of software comes in. It goes by the name of "LaminaDesign"
 It was developed by Paul Haeberli, and it does it's job exceptionally well! It hasn't seen alot of developement action recently, but hopefully my assertive nagging will have an impact!
It's interface is not complicated, but packs a bunch of useful features. Upon install, there is a text file in the main installation folder, which allows well documented options for tweaking the software's behavior.
I thought I would unwrap a simple model to show you how the process works, and how simple it really is.
 This is the basic model created in Hexagon. It's pretty simple as a shape, but figuring it out as a flat would be nightmarish! Especially the fact that it's tapered.
 I exported the model out as an STL and dragged it into LaminaDesign. The red lines are the deviations in the geometry, which LaminaDesign assigns as cut lines.
 If I explode the drawing at these settings, I would get a whole pile of parts and pieces. If I wanted to laser cut this from clear acrylic, with faceted edges, this would be amazing. You even have the choice of adding numbers to the parts, with snap-off tabs. However, I want a continuous sheet. Maybe I plan on cutting this from .060" styrene, and only want 1 single join. No problem!
 I would select the draw tab from the main menu, then select the delete icon. Now I just have to rotate around the model, deleting all the red cut lines. You do have to be a little intelligent on how you determine the join though. You can also choose the pencil icon to draw your own custom cut line. This is very well documented in the online manual, so I won't go into it here.
 I have deselected all the lines, except for the seam at the top of the shape, and one single line where the unwrapping will split apart from.
 BAM! Here is the shape flattened out! I can choose from the dropdown menu's if I want the numbered parts or not, or the size of the numbers. But in most cases for cutting on our Techno, it would be wasted time.
This is now where the material thicknesses come into play! I can assign a material thickness from the menu, as well as add my own material via the settings file in the install directory. You can also assign how flexible your material is, resulting in slight geometry changes based on if it's really stiff or not.
 You also have plenty of options for joining the pieces as well. From finger joins, straight joins, tabs, stitch holes, etc. The nice thing is that in the image above, I chose finger join, and it takes into account the material thickness assigned to it for the finger-depth!
I can now save out the job, which Lamina Design writes to a folder, containing a PDF file, as well as a vectored DXF. It also saves out the job and materials information as well. You can assign a sheet size as well, and import that into Aspire, or Corel, or any vector editing software.
So there you go! Unwrapping made easy by smart software developers. Man I love computers!
8)
JO
I get alot of emails inquiring about "un-wrapping" 3d geometry for planar cutting on our Techno. In-fact, the last 2 jobs featured the use of this for a couple of pieces, the Monopoly hat, and the sides of the Plinko game ramp.
Some Cad software has this ability built into it, right out of the box. Other programs, like Sketch-up have 3rd party 'add-on' plugins, which do work. We do our full 3d modelling mostly with Hexagon, which is solely a polygon modeller. This can have it's draw-backs when trying to lay geometry flat out. Trying to unwrap it in programs like Corel are impossible to do, as they don't support 3d geometry.
Enter our little secret!
We actually use 2 programs for this. One is called Pepakura designer. This was developed for making paper models from 3d polygon-models. It's a nifty package, but it's geared toward printing on sheets of paper with tabs, that you trim out, fold, and glue up. We have actually done this for creating printed texture maps, for applying to large 3d models we have machined. The draw-back is it doesn't account for any material thicknesses.
That's where a little power-house piece of software comes in. It goes by the name of "LaminaDesign"

It's interface is not complicated, but packs a bunch of useful features. Upon install, there is a text file in the main installation folder, which allows well documented options for tweaking the software's behavior.
I thought I would unwrap a simple model to show you how the process works, and how simple it really is.


This is now where the material thicknesses come into play! I can assign a material thickness from the menu, as well as add my own material via the settings file in the install directory. You can also assign how flexible your material is, resulting in slight geometry changes based on if it's really stiff or not.

I can now save out the job, which Lamina Design writes to a folder, containing a PDF file, as well as a vectored DXF. It also saves out the job and materials information as well. You can assign a sheet size as well, and import that into Aspire, or Corel, or any vector editing software.
So there you go! Unwrapping made easy by smart software developers. Man I love computers!
8)
JO
Monday 17 December 2012
LET THERE BE HOCKEY!!!!
Well at least the NHL rinks will get used for something this year! We were contacted to make 3 hockey related games for Molson Canadian breweries. We received what were considered to be "napkin sketches" of some simple games for some kind of promotional campaign. Not overly complicated, but they did require a little planning at the computer end before we could start jumping right in!
The first game up is "Molson Plinko". Basically the puck comes in at the top, bounces down a whole mess of pegs, and lands in a section at the bottom with the "prize". Woo-hoo!
 The first step was to layout the vectors full size, based on the very loose guidelines set by the napkin sketch. From this point, I exported them out to our 3d modelling software.
 Once the vectors were imported, I was able to rotate them back to 80 degrees, which is the angle we all agreed upon.
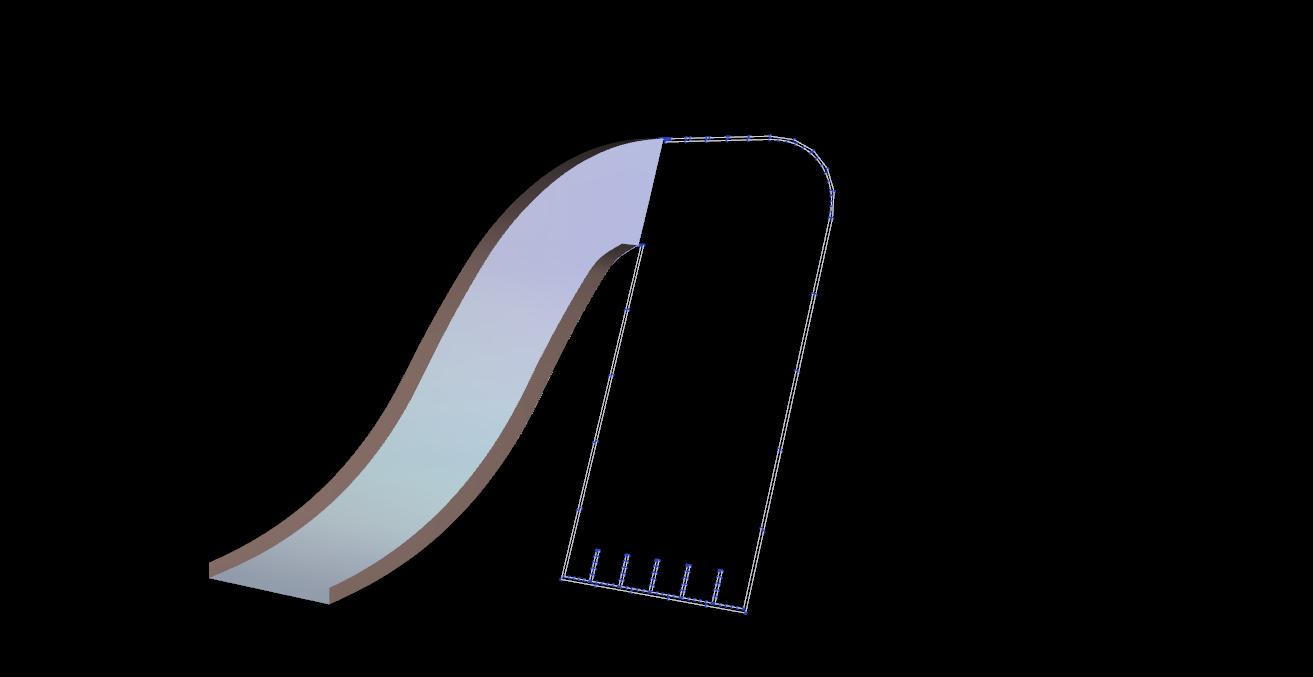
 The next step was draw up the ramp the puck needed to get to the top of the Plinko challenge. This is a pretty nasty ramp. The top of the game stands at 6 feet tall. Them's some steep games!
 After I confirmed the ramp met the height and width it needed to be, I extracted the sides, and exported them out for unwrapping. The whole ramp will be made from 1/4" pvc on the slide, and 1/2" pvc for the sides.
 This is the sides after being unwrapped, and adding the rabbet to slot onto the 1/4" slide portion. The rabbet was cut in around 3/8" to allow for #6 screws to pin the slide portion from underneath.

 The art-work was supplied, and we had the great Autotrim in Lindsay print it out on pressure sensitive vinyl for us to install. I made things easy by rabbeting in a track for all the walls to sit into. This increased the gluing area for the pvc, as well as giving us a definitive border to trim the print to, once installed on the 1/2" pvc. All of these games get backed up with 3/4" plywood, for super-strength. The plywood also lets us hinge the fold-out legs, for easy set-up.
 I also cut the acrylic cover that will mount onto the front of the game. This serves 2 purposes. One is to trap the puck in the game, and the second is to fasten the other end of the bolts of the pegs to.
 Once it was all together, it looked great! Quite a challenge to get the puck up into, but good looking nonetheless!
 With the ramp installed, it looks like it will be a lot of fun.
8)
JO
The first game up is "Molson Plinko". Basically the puck comes in at the top, bounces down a whole mess of pegs, and lands in a section at the bottom with the "prize". Woo-hoo!


8)
JO
Thursday 13 December 2012
Die Gingerbread, Die!
The last week and a half have been a whirlwind of projects, modelling, and quoting! Albeit, a tired week and a half.
A few of the smaller projects we can't mention, but I will post as soon as we can. The most recent one is a series of 5 posters. The finals come out tomorrow, so I can name names then.
Basically they're a fun project, that revolves around the Holidays. Very Timely indeed!
We were asked by photographer Vicky Lam to create ginger-bread men torturing each other with household kitchen stuff. Nice!
It became apparent very quickly that real gingerbread men wouldn't cut the mustard. So we needed to create some realistic ginger-stunt-men.
 We made up the ginger bread dough, and rolled it all out. I drew up a quick little man and printed him out, slapped him on the dough. Then trimmed him out. I made 3 of them in total at varying thicknesses, so I could choose a hero one after they were baked.
.jpg) I put brass nails into the arms, legs, and head, so when we make the 2-part mold, I'll have suspension points. The 3rd guy was a little to thin, and I almost wasn't going to use him, but I thought I could grind him up for crumbs on set if we needed. I didn't bother putting the pins in the 3rd guy.
I put brass nails into the arms, legs, and head, so when we make the 2-part mold, I'll have suspension points. The 3rd guy was a little to thin, and I almost wasn't going to use him, but I thought I could grind him up for crumbs on set if we needed. I didn't bother putting the pins in the 3rd guy.
.jpg)
As it turned out, the 3rd one was the best, by a landslide, he had nice texture, and no cracking. DOH! The others looked a bit too thick to me, so the original "throw-away" became the Oscar winner. I ended up drilling small holes in all the extremities for sticking in the little brass nails.
I made the ginger-bread actors at home, due to the fact I have no oven at the shop. I brought home some pvc strips that I could cut up for making the mold box. Just a simple frame, hot glued to a board would do the trick. I traced the little guy onto the board, plugged in the glue gun, and decided to check the layouts on my laptop, one final time. It was at this point, I could here a strange noise coming from the living room. Hmmm......... I decide to investigate. This is where I found the source of the strange noise. At first I thought it was the dog licking himself. It turns out it was the dog chewing down the last of our hero ginger-bread man. The only thing left was a small, neat pile of the brass nails, some crumbs, and a stub of a foot. I only left him for a minute. Nature can be so cruel, so cruel indeed.
I was pretty pissed. But at least I had 2 spares, even though they were my second choice. At least they had the brass nails in them already.
.jpg)
I finished gluing the mold box together, and mixed up the silicone resin. This was carefully brushed right onto the cookie. It looks a lot tastier than it smelled, that's for sure. Brushing it on like this eliminates almost all of the chance of air bubbles curing on the surface of the mold, which would leave small pimples all over the castings.
.jpg)
I poured the rest of the mold rubber into the mold box I had glued up, and placed the cookie face down into the rubber. The brass nails rested on the edge of the mold box, suspending the cookie off the bottom. Once the rubber had cured, I cut tapered divots into the rubber between the arms, legs, and head. This will give the 2 mold halves something to "key" together with, making sure both halves of the mold are perfectly aligned. I built up the sides of the mold box with a few layers of masking tape, so I could pour the next layer.
.jpg)
It came out great! Every ounce of miniscule detail was captured by the silicone. The texture was awesome. The whole point of casting the cookies was to give us a super strong material in which to work with. The other benefit was that we could pull the parts, carefully timed, as soon as they kicked, allowing us to bend the cookies into all kinds of poses, thus essentially giving them life to the layouts.
.jpg)
The resin cures to a bright white plastic, so we darkened it up with a few drops of brown tint, while mixing. This would help at painting time, and if the paint gets scratched on set, it won't really matter much.
.jpg)
This was my work center for the duration of the shoot at Westside Studio. Sprinkles, icing, power tools and crumbs. This is the worlds best job!
All the details to the ginger-bread men were added on the shoot day with real icing. The nice thing about this is that if I messed up on drawing the faces, I could just rinse them off and start over!
.jpg)
The set was fairly small, with simple backdrops. The gruesome scenes were the focus of the ads.
.jpg)
The only character we didn't cast was the stretcher rack scene. I couldn't get the casted guys to bend to that extreme. The solution was to cut the man out on our Techno, using 1/4" pvc. After he was cut, I burned him up with a torch, which gave us the same cookie texture, and let me tweak the shape while the pvc was still hot. Then he got the same paint job as the others.
.jpg) I think the cheese grater murder was my favourite! The red sprinkles really drive home the horror!
I think the cheese grater murder was my favourite! The red sprinkles really drive home the horror!
.jpg) For the ghastly toaster scene, a real toaster was supplied by Vicky. I brought a red LED light, that with some reversible hacking, was able to get into the toaster slots. This shone up onto the cookies, making it look like the toaster was super hot. I blackened the victim cookie with a lighter to add to the horror.
For the ghastly toaster scene, a real toaster was supplied by Vicky. I brought a red LED light, that with some reversible hacking, was able to get into the toaster slots. This shone up onto the cookies, making it look like the toaster was super hot. I blackened the victim cookie with a lighter to add to the horror.
.jpg) The final shot of the day was the "Death by Latte" scene. One cookie drowning hit man style! While Vicky was shooting this scene, coffee was dripped into the cup via an eye dropper, to give the scene a sense of struggle.
The final shot of the day was the "Death by Latte" scene. One cookie drowning hit man style! While Vicky was shooting this scene, coffee was dripped into the cup via an eye dropper, to give the scene a sense of struggle.
This was awesome! The creative was rock solid, and the job was really low stress, just the ticket after the last crazy ones!
I'll post the finals tomorrow, I think that's when they come out.
8)
JO
A few of the smaller projects we can't mention, but I will post as soon as we can. The most recent one is a series of 5 posters. The finals come out tomorrow, so I can name names then.
Basically they're a fun project, that revolves around the Holidays. Very Timely indeed!
We were asked by photographer Vicky Lam to create ginger-bread men torturing each other with household kitchen stuff. Nice!
It became apparent very quickly that real gingerbread men wouldn't cut the mustard. So we needed to create some realistic ginger-stunt-men.

.jpg)
.jpg)
I made the ginger-bread actors at home, due to the fact I have no oven at the shop. I brought home some pvc strips that I could cut up for making the mold box. Just a simple frame, hot glued to a board would do the trick. I traced the little guy onto the board, plugged in the glue gun, and decided to check the layouts on my laptop, one final time. It was at this point, I could here a strange noise coming from the living room. Hmmm......... I decide to investigate. This is where I found the source of the strange noise. At first I thought it was the dog licking himself. It turns out it was the dog chewing down the last of our hero ginger-bread man. The only thing left was a small, neat pile of the brass nails, some crumbs, and a stub of a foot. I only left him for a minute. Nature can be so cruel, so cruel indeed.
I was pretty pissed. But at least I had 2 spares, even though they were my second choice. At least they had the brass nails in them already.
.jpg)
.jpg)
.jpg)
.jpg)
.jpg)
All the details to the ginger-bread men were added on the shoot day with real icing. The nice thing about this is that if I messed up on drawing the faces, I could just rinse them off and start over!
.jpg)
.jpg)
.jpg)
.jpg)
.jpg)
This was awesome! The creative was rock solid, and the job was really low stress, just the ticket after the last crazy ones!
I'll post the finals tomorrow, I think that's when they come out.
8)
JO
Subscribe to:
Posts (Atom)